Last Updated on August 10, 2020 by Jake
Knowledge of how to hold a pool stick properly is one of the most important fundamentals of pool. Knowing how to hold a pool stick allows you to make good, accurate shots consistently. Over time, this is the key to improving your play.
However, it’s no surprise that many beginners hold the cue wrongly simply because they were never taught how to hold a pool stick. This can make the game a frustrating one, as holding the cue the wrong way reduces steadiness, focus and most important of all precision.
To fully enjoy the game, you must have the basics nailed down. After which you can learn to master the different types of techniques (bridge). With the right knowledge and technique, you would see a lot of improvement in your game. Thus ensuring your chances of winning a game of billiard are high. In the rest of this post, we’ll go over some tips and technique for how to hold a pool stick!
Table of Contents
How to Hold a Cue – The Basics
Hold The Cue with Your Dominant Hand
Ensure that you grip the pool cue with your dominant hand close to the rear of the stick (this should be about 4 inches from the end of the cue). Your cue might have tape or some sort of markings about 4 inches from the end to signify where your hand should go.
- Your grip needs to be relaxed yet controlled, firm enough to be in control but loose enough to be able to move fluidly. Your wrist angle should be perpendicular to the cue, or 90-degree angle to the cue. Grip the cue at your waist.
- Guide the tip of the cue stick (the end that will strike the cue ball) with your non-dominant hand. We’ll go over different techniques later for how to use your guide hand.
Lower Your Upper Body to The Table
Once you correctly grip the cue stick, and positioned your shot, lower your upper body towards the table so you line up with the cue ball. You should be looking right down the line of the ball. You should be relaxed. Bent your legs slightly and keep them a few inches wider than your shoulders.
Bridge The Tip of the Stick with Your Other Hand
Make a bridge by placing the other end of the cue stick between your thumb and index finger. Your non-dominant hand that guides your cue should be at rest on the pool table, about 7 inches behind the cue ball. The closer your hand is to the ball, the more accurate your shot will be. The further away it gets, the less accurate you will be but the more power you can put behind your shot.
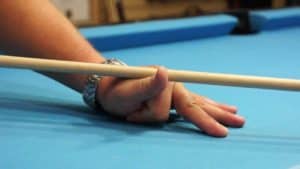
The most common bridge is the open bridge. To form an open bridge:
- Put your non-dominant hand on the pool table (while your dominant hand grasps the rear end) and spread your fingers.
- You can slide the cue stick between your thumb and index finger or between the knuckles of your index finger and middle finger.
- You can change the angle of the cue tip by lowering or raising the arch of the index finger, giving you more control over your shot.
Steadily Hold the Cue Stick and Line Up the Target
Lean forward and picture where the cue tip hits the cue ball. You should also be able to picture a direct line between the cue ball and the object ball (this is the ball you want to hit with the cue ball). For now, try to strike the ball dead center. This ensures the ball goes in the same direction you strike it. As you get better at the game, you can experiment with different angles and perfect your technique.
Balance The Cue and Take the Shot
Confidently, slide the cue stick forward. If you are unsure of the strike, move the cue stick back and forth as you steady the shot. When you are ready, strike the ball in one sweeping motion and carry through slightly after taking the shot. Don’t simply poke the ball.
As already detailed, remember to:
- Hold the pool cue in a relaxed and loose manner with your dominant hand at your waist.
- Hold the cue from the outside and use your thumb to support on the inside. The other hand on the table keeps the cue in place as you move the cue forward.
- As you take the shot, don’t tighten up, as that can cause the cue to jerk just a little, which is more than enough to change the direction of the cue ball.
- Also, keep your body low through the entire shot.
Different Bridge Techniques to Use
Now let’s look at the different bridge techniques available that are all great variations of how to hold a pool stick. Note, a pool glove can greatly aid your ability to hit consistent shots.
The Open Bridge
This is what we used in the section about holding the cue stick. This method is the most used because it is effective and simple. With practice, most enthusiasts have discovered that it is as accurate as even the closed bridge.
- Firmly plant your hand on the pool surface and spread out your fingers especially, the space between your thumb and index finger.
- Place the cue tip in the v-channel that forms between your index and thumb. For better accuracy, lift up your thumb.
- Similarly, you can place the cue tip between the index middle finger for a better grip.
- With a continuous motion, using your dominant hand (which holds the cue stick by your waist), strike the ball.
The Rail Bridge
When the ball is close to the rail, there isn’t enough space between the rail and the cue ball for you to form a bridge on the playing surface. You need to form a bridge with the help of the rail. Depending on the distance between the ball and the rail, different rail bridges need to be utilized.
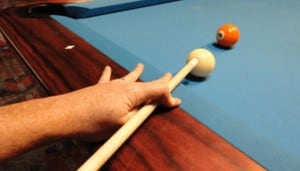
When The Cue Ball Is About 4 To 6 Inches from The Rail
With this bridge, the ball isn’t too close to the rail, yet it’s close enough that you need to utilize the rail in your bridge.
- Start by placing your hand on the rail.
- Then lift your index finger over your thumb. Place the cue between your thumb and index finger so your thumb in under the cue stick and your index is over it.
- Use the rail to stabilize your shot. Line up your shot and take it.
When The Cue Ball Is About 1 Or 2 Inches from The Rail
When the ball is very close to the rail, you need to utilize a different technique. This is because the ball is so close that the traditional rail bridge described just above cannot work. Utilize this technique to maximize your accuracy.
- Start by placing our palm on the edge of the rail. You can spread your fingers on the playing surface for extra support.
- Then lift your index finger over the rail. Place the cue tip end on your thumb to guide the shot.
- Use the rail to stabilize your shot. Line up your shot and take it.
The Elevated Bridge

Sometimes, there is a ball right between you and the cue ball. In this case, use an elevated bridge to get over the ball between you and the cue ball.
- Place your index finger almost perpendicularly and firmly on the table.
- Support the index finger with your pinkie and tuck your ring and middle fingers under your hand so they too touch the board. This forms a tripod
- Push out your thumb to create a ‘v’ between the thumb and index finger.
- The cue tip goes between the thumb and index finger for the shot.
The Closed Bridge

This is an advanced technique that allows for more precision. However, it needs to be done correctly if it is to be effective. Not only does this technique give you the edge over your opponent, but it also makes you look like a pro.
- While holding the cue with your dominant hand, place your other hand on the table and make a fist.
- Spread out your middle finger, ring finger, and pinkie while keeping your index finger tucked in. your thumb needs to be underneath the index finger. Ensure the index finger forms a loop with the thumb.
- Gently push the cue tip through the loop, and out the V of the index and middle fingers. The thumb must be on the outside of the cue and the index finger on the inside. The tip of the thumb needs to be pressed against the tip of the index finger.
You can now take the shot. The loop created by the index finger and the thumb ensure the shot is more accurate.
The Mechanical Bridge
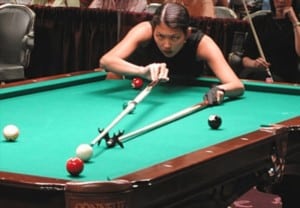 When the cue ball is far out in the middle of the table, you can find it difficult to lean over the playing surface to create a bridge. In these cases, it may be better to use a mechanical bridge. This offers stability. Trying to form a bridge with your hand can lead to you being off-balance and getting the shot totally wrong. With the help of a granny stick or crutch (only common names of the mechanical bridge), you can sink the shot with minimal effort.
- Put the mechanical bridge on the table and position it behind the ball.
- There is an indentation in the mechanical bridge where you position the cue stick.
- Using your dominant hand’s index finger, thumb and middle finger hold the butt cap of the cue.
- Line up the shot and in one continuous motion, take the shot. Remember to follow through slightly.
How to Hold a Pool Stick – Wrap Up
The only way to truly improve is to practice these techniques described. With practice and knowledge of how to hold a pool stick, you will be playing like a pro in no time. Here are a few more tips for how to hold a pool stick before you go!
First of all, get a pool cue stick which is the right weight for you. The right stick will feel light and balanced in your hand and make how to hold a pool stick a lot easier. Secondly, clean your cue stick regularly. Wipe it come with a cloth after each game. Also, you use cue cleaning products such as a cue smoother and a burnisher every now and then.
Thirdly, keep a consistent height from the table when you use a bridge. This improves precision. Lastly, be mindful of people around you so you don’t injure anybody when taking a shot.
Check out our mega post on game room ideas next!